Mục lục bài viết
- Terraform là gì?
- Tại sao nên dùng Terraform?
- Cài đặt Terraform
- Chuẩn bị AWS Account
- Tạo S3 Bucket
- Variables – Làm code linh hoạt hơn
- Lệnh Terraform quan trọng
- Các Lưu Ý Quan Trọng
- Tham khảo
- Kết luận
Trong số các công cụ IaC, Terraform được sử dụng khá nhiều nhờ những lợi ích như cộng đồng lớn, hỗ trợ nhiều cloud provider như AWS, AZURE, GCP.
Terraform là gì?
Với Terraform, bạn viết code để mô tả những gì cần tạo cho cơ sở hạ tầng (server, database, network…), và Terraform sẽ tự động tạo cho bạn.
Tại sao nên dùng Terraform?
1. Tiết kiệm thời gian
- Tạo 10 server?Bạn chỉ cần copy code và đổi tên là xong
2. Không sợ sai sót
- Code một lần, chạy nhiều lần – kết quả luôn giống nhau
- Dễ dàng xem lại và sửa lỗi
3. Quản lý dễ dàng
- Xóa mọi thứ chỉ với lệnh terraform destroy
- Có thể dùng tạo các cơ sở hạ tầng của nhiều cloud provider khác nhau như AWS, AZURE, GCP, …
Cài đặt Terraform
Trên Windows
Tải file từ terraform.io/downloads rồi tự cài đặt
Sau đó kiểm tra bằng lệnh:
terraform versionTrên Mac
brew install terraformTrên Ubuntu/Debian
wget -O - https://apt.releases.hashicorp.com/gpg | sudo gpg --dearmor -o /usr/share/keyrings/hashicorp-archive-keyring.gpg
echo "deb [arch=$(dpkg --print-architecture) signed-by=/usr/share/keyrings/hashicorp-archive-keyring.gpg] https://apt.releases.hashicorp.com $(grep -oP '(?<=UBUNTU_CODENAME=).*' /etc/os-release || lsb_release -cs) main" | sudo tee /etc/apt/sources.list.d/hashicorp.list
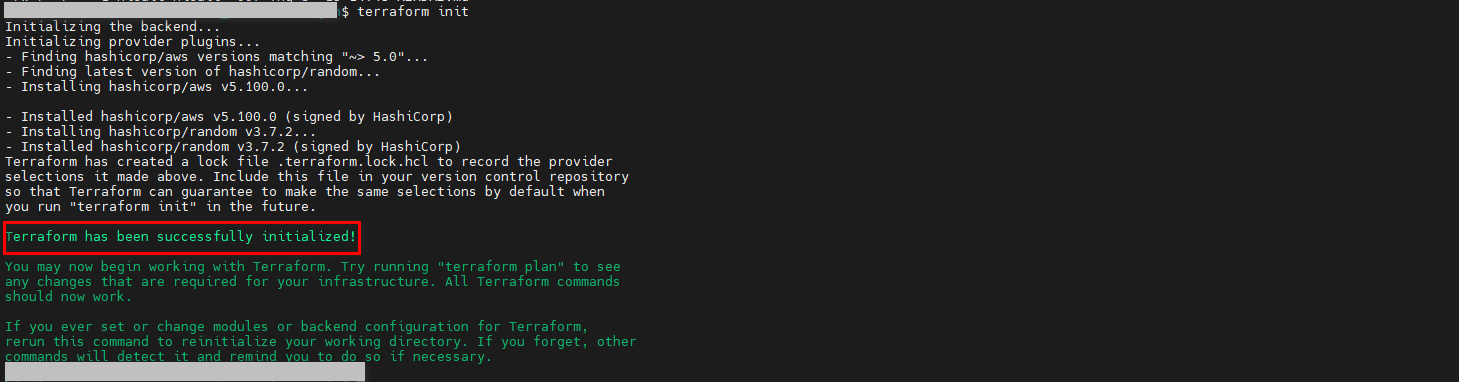
sudo apt update && sudo apt install terraformBài viết này tôi làm trên Ubuntu 24.04.2 và có kết quả như hình:


Chuẩn bị AWS Account
Bạn cần có:
- AWS Account
- Access Key và Secret Key – Lấy từ IAM User trong AWS Console
Tạo S3 Bucket
Bước 1: Tạo file cấu hình
Tạo thư mục mới và file main.tf:
# The Easiest Terraform Project on AWS

# This creates a simple S3 bucket

terraform {

  required_providers {

    aws = {

      source  = "hashicorp/aws"

      version = "~> 5.0"

    }

  }

}

provider "aws" {

  region = "ap-northeast-1"  # Tokyo region

}

# Create a simple S3 bucket

resource "aws_s3_bucket" "my_first_bucket" {

  bucket = "my-first-terraform-bucket-${random_string.bucket_suffix.result}"

  tags = {

    Name        = "My First Terraform Bucket"

    Environment = "Learning"

    CreatedBy   = "Terraform"

  }

}

# Generate random string for unique bucket name

resource "random_string" "bucket_suffix" {

  length  = 8

  special = false

  upper   = false

}

# Output the bucket name

output "bucket_name" {

  value = aws_s3_bucket.my_first_bucket.bucket

}

output "bucket_arn" {

  value = aws_s3_bucket.my_first_bucket.arn

}
Lưu ý bảo mật:
Trong thực tế, KHÔNG BAO GIỜ để key trực tiếp trong code. Hãy dùng environment variables:
export AWS_ACCESS_KEY_ID="your_access_key"

export AWS_SECRET_ACCESS_KEY="your_secret_key"
Bước 2: Khởi tạo Terraform
Mở terminal trong thư mục chứa file main.tf:
terraform initLệnh này sẽ tải các plugin cần thiết cho AWS. Chờ khoảng 15 phút, nếu thành công sẽ cho kết quả hiển thị như sau:
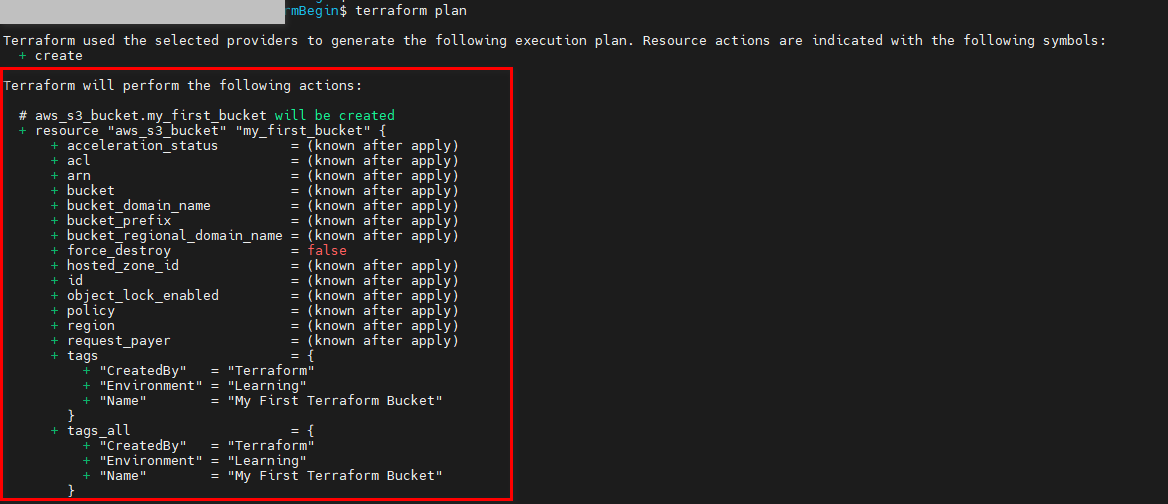
Bước 3: Xem Terraform sẽ làm gì
terraform planTerraform sẽ hiển thị “kế hoạch” – những gì sẽ được tạo. Đọc kỹ để đảm bảo đúng ý bạn.
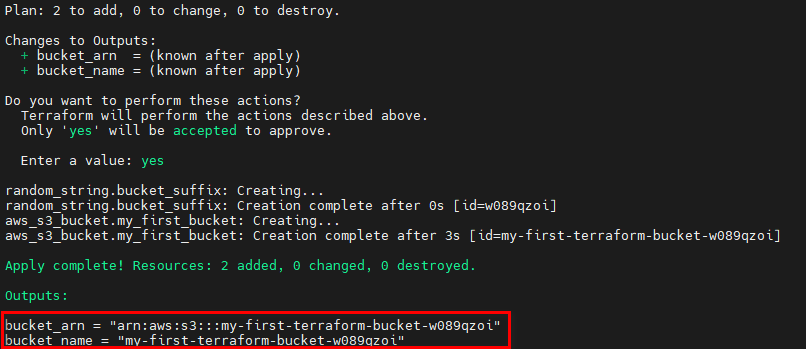
Bước 4: Tạo thật trên AWS
terraform apply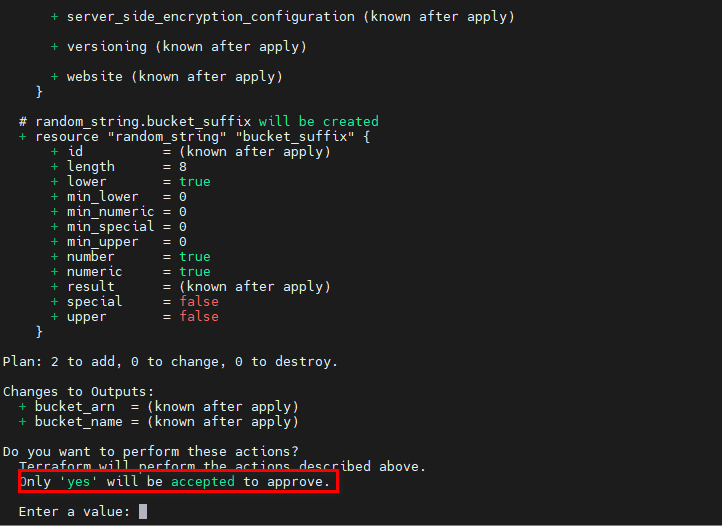
Gõ yes khi được hỏi. Đợi khoảng 30 giây, bucket s3 sẽ xuất hiện trên AWS!
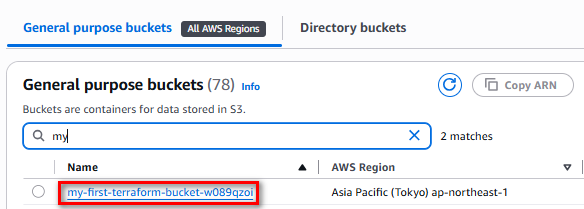
Bước 5: Kiểm tra kết quả
Vào AWS Console → s3
Bước 6: Clean up
terraform destroyVariables – Làm code linh hoạt hơn
Thay vì hardcode mọi thứ, dùng variables để dễ thay đổi:
variables.tf:
variable "instance_type" {

  description = "Loai EC2 instance"

  default     = "t2.micro"

}

variable "server_count" {

  description = "So luong server can tao"

  default     = 1

}
main.tf:
resource "aws_instance" "app_server" {

  count         = var.server_count

  ami           = "ami-0df7a207adb9748c7"

  instance_type = var.instance_type

  tags = {

    Name = "App-Server-${count.index + 1}"

  }

}
Lệnh Terraform quan trọng
terraform init      # Khởi tạo project

terraform plan      # Xem trước thay đổi

terraform apply     # Áp dụng thay đổi

terraform destroy   # Xóa tất cả resource

terraform fmt       # Format code

terraform validate  # Kiểm tra syntax
Các Lưu Ý Quan Trọng
1. Luôn dùng terraform plan trước apply
Đừng bao giờ apply mà không xem plan trước.
2. Quản lý State file cẩn thận
Terraform lưu trạng thái trong file terraform.tfstate. File này QUAN TRỌNG:
- Backup thường xuyên
- Không commit vào Git (chứa thông tin nhạy cảm)
- Nên dùng remote backend (S3) cho team
3. Sử dụng workspace cho môi trường khác nhau
terraform workspace new dev

terraform workspace new production
Tham khảo
- Documentation chính thức: terraform.io/docs
- AWS Provider docs: registry.terraform.io/providers/hashicorp/aws
Kết luận
Terraform mang đến khả năng tạo cơ sở hạ tầng bằng code với nhiều ưu điểm như tiết kiệm thời gian, hỗ trợ nhiều cloud provider.
Hy vọng bài viết có ích và cảm ơn độc giả!
Để lại một bình luận